The good thing about most of the varieties of Linux OS is that upgrade to the next version is a relatively easy task. Of course, there can be problems with software/drivers compatibility, but in general, these operating systems are designed to support this kind of upgrades. Users of <whatever>buntu that is at least a couple of years old can do a migration to the most recent one. But, the newer the version of the OS – the more resources it requires.
This particular writing is about disk space, and in particular /boot partition. While installing something like Ubuntu 14.04 years ago the installer may suggest a default partitions layout with /boot partition having a size even below a hundred of megabytes. And at that time it was just enough. Then come new versions of OS and software, new kernels, and so on. Upgrades turn to be not that easy anymore. /boot partition is being polluted with old kernels and other leftovers, and needs to be cleaned again and again to complete installation or upgrade.
How to stop this repetitive pain? In case of LVM this could be an easy task but what if it is just a normal filesystem?
Depends on the layout of the partitions it can happen that /boot sits somewhere at the very last physical place on the drive and then it is just a matter of adding extra space to it (if it is available).
But it could be that the layout looks like this:
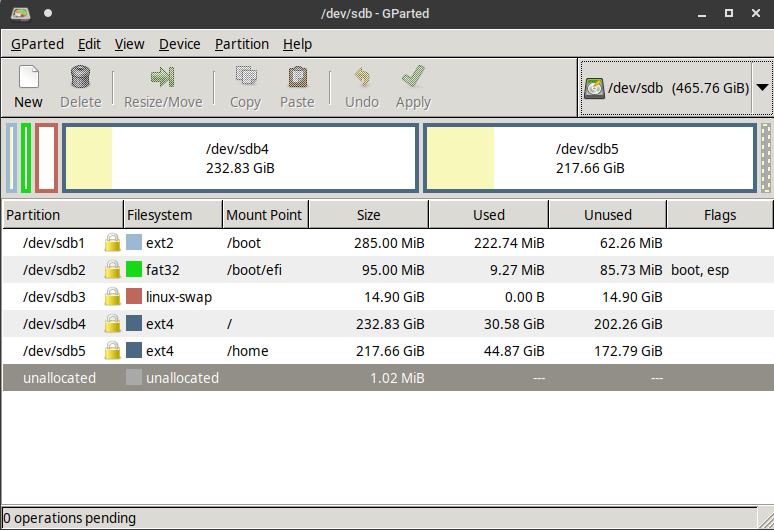
In this case /boot is the very first partition and moving/resizing of the next ones may be risky.
Disclaimer!
- Any manipulations with the filesystem may corrupt it, thus be careful and think twice.
- The current guide is suitable for UEFI boot mode as it is based on partition UUIDs. And in the case of MRB it will not work.
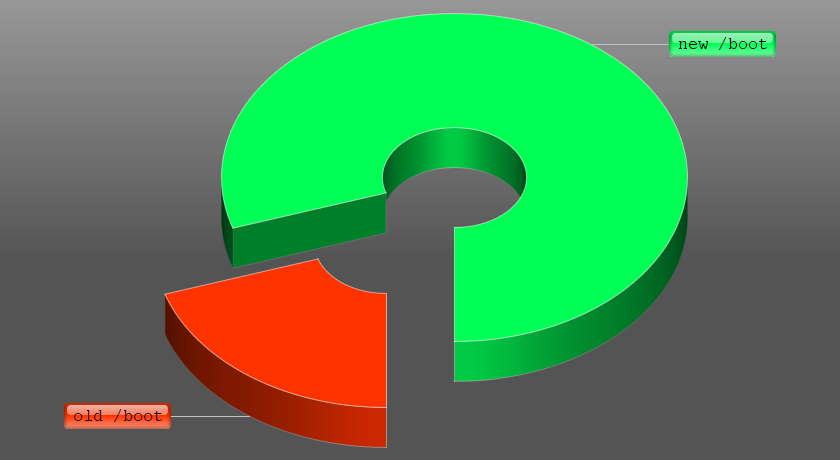
Still, the situation depicted in the image above is not hopeless.
All the operations with the filesystem must NOT be done on the live running system. Instead, a live CD must be used. A good option for this guide is GParted live CD.
Having in mind UEFI feature: partitions lookup is done by UUID, the following steps will allow to extend /boot partition:
- Boot with a live CD (e.g. GParted live CD).
- Free some space. For the example above a good option could be to cut a bit of
/sdb4from the rear part.
Note! It is much riskier to cut the front part of the partition or moving it. - With GParted copy
/bootpartition and paste it to a newly freed place, then resize it to occupy available space. - Now the most important step. As the copy of the partition has the same UUID the old
/bootmust get a new UUID to avoid UEFI confusion. This can be also done with GParted (right-click on the old/bootpartition -> [New UUID] menu item). - Then all the settings must be applied and after reboot the system should use the new extended
/bootpartition.
New partitions layout will look like this:
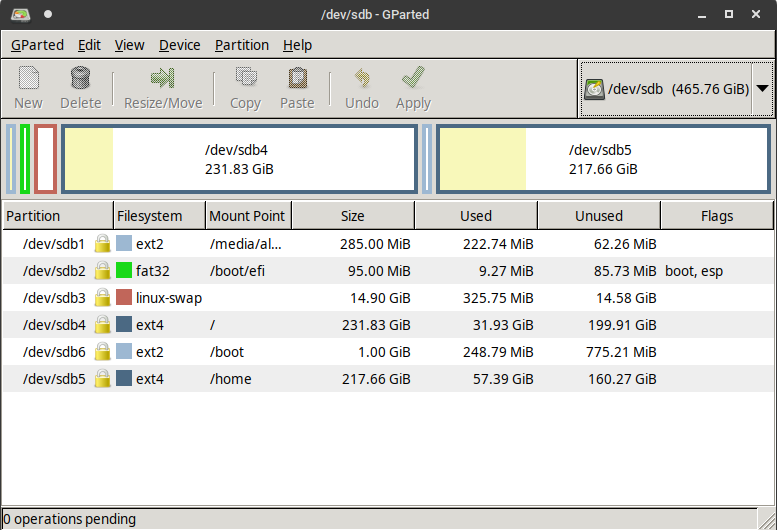
If it is not needed then the old /boot partition can be removed.
Done.
![]()
I followed your description! Instead of copying I was just moving and extending the boot partition from 700 MBs to 3.3 GB. Hope now, I have some place to collect some old kernels.
I needed the solution for my luks encrypted LVM.
Thanks very much, because I was a little panicking if this would work, especially when GPARTED throws the messages as if world is ending next day…. I was wondering regarding UUID and order of partition, but it worked flawlessly (obviously it did not change its order, so I still do not know, but the UUID stayed the same… good for me).
BTW the captcha is very nervous and outtiming very fast. So I guess that is why are no comments here!
Top Articles here!
Thank you for your feedback! I appreciate your effort on writing it.
By the way, I agree, the captcha is for sure annoying, but without it I had so much spam. I will look into this problem, and hope I can improve the situation.
Hi! 4 years later and this tutorial still works 😉
I’ve read your tutorials and bunch of others about how to resize boot partition with LUKS encryption and your tutorial saved me a lot a time !
Little note: when a copied boot partition in the newly bigger space, a random UUID was already set to my new boot partition. I deleted the old boot and set the old UUID to the new one and it works perfectly
Thank you very much sir 😉
I am happy to hear that this writing still has value! 4 years of backward compatibility shows the solid basis that Linux has.